Processing-Tutorial: Video Export
Important info: Unfortunately the Tutorial is not up to date by now and basically does not work the same on all operating systems. You can find an alternative workflow here.
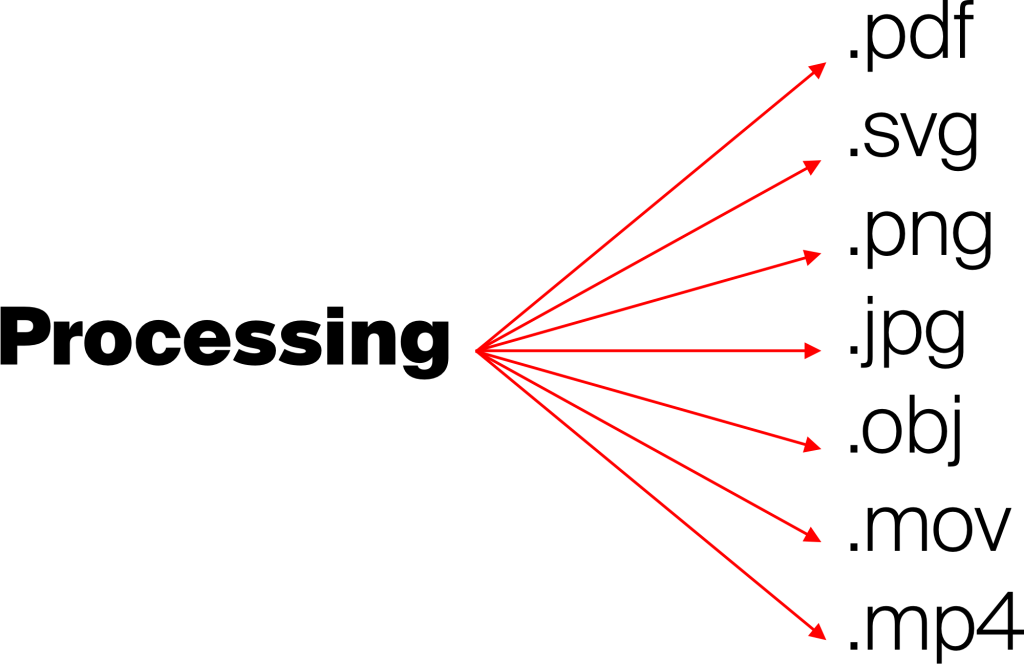
One of the most powerful features of Processing in comparison to all web-based approaches and frameworks (like p5.js) is the ability to export your sketches to any format you can imagine. Processing does not provide all of these options out of the box, but there are excellent libraries for any use case.
Since i use instagram to distribute my work, i’ve developed an optimized, slick workflow to export videos and i wanna share it with you today.
Let’s get started!
There are multiple ways to export a video from your sketch in Processing and i’ve tried them all. The most easy and intuitive one is utilizing a Processing-library called Video Export by Abe Pazos.
Before we can use that library in Processing, we have to install something called “FFMPEG” on our computer, which is a powerful software for video-conversion that can be used via the command-line. It is made for programmers and programmers install things a bit differently than “normal” people.
Please do me little favor and promise that you won’t stop working through this tutorial from now. The things we’ll do together in the next steps may look a bit overwhelming for you, but they are simply required. In the end you’ll don’t have to worry about them anymore. Let’s take a deep breath and get going.
Installing FFMPEG on a mac
1. Open up the Terminal
The Terminal is an utility-application of MacOSX that enables us to install the software we need. It can be found in the applications-folder inside “utilities”.

1. Install HomeBrew
Copy this code into the command-line of the terminal:
/bin/bash -c "$(curl -fsSL https://raw.githubusercontent.com/Homebrew/install/master/install.sh)"The script will install “HomeBrew”, which is a so called “package manager”. It enables us to install software via the Terminal easily.
If you are logged in as an admin, the script will ask you for your password. If you are not logged in as an admin in MacOSX, you’ll have to write the command above with a “sudo” in front.
sudo /bin/bash -c "$(curl -fsSL https://raw.githubusercontent.com/Homebrew/install/master/install.sh)"Put it in there and hit enter. The script will run a few seconds.
2. Install FFMPEG
Then, put this code into the Terminal and hit enter:
brew install ffmpegAgain: If you’re not logged in as an admin, you’ll have to put the “sudo” command in front and then type your username and your password.
sudo brew install ffmpegHopefully everything works fine and we can go to the next section to install the actual library.
Installing FFMPEG on Windows 10 (by Hanna Donker)
I don’t have a Windows PC, but fortunately Hanna Donker has written detailed instructions for installing FFMPEG on Windows. Many thanks Hanna!
Download FFMPEG from here:
https://ffmpeg.org/download.html#build-windows
Click on ‘Windows builds from gyan.dev’
https://www.gyan.dev/ffmpeg/builds/
Download the ‘ffmpeg-git-full.zip’
https://www.gyan.dev/ffmpeg/builds/ffmpeg-git-full.zip
FFmpeg doesn’t need installing on Windows, but the folder does need to be added to PATH (it needs to be able to be ‘called’).
1. Choose a location for FFMPEG to be saved. C:\ is a good place as you’re not likely to delete or move it. Unzip the folder.
2. Then click Start -> type in Control Panel -> System -> Advanced System Settings
3. Click on Environmental Variables
4. Double click ‘Path’ in the System variables table – it will open a new window (‘Edit environment variable’).
5. Click New and put ‘C:\FFmpeg\bin’.
6. Confirm that that folder is okay by going to C:\FFmpeg\bin – you should see these three files there:
7. Click OK, OK, and close the Control Panel
8. Open cmd (command prompt) and type ‘ffmpeg’ – it should come up with a list of optional commands. This means that command prompt recognises ffmpeg, and any script that it calls should work.
Installing the VideoExport-library
In Processing, go to the menu “sketch > import Library > Add Library”. The so called “contribution-manager” will open up. Click “Video Export” and then click “Install”. That’s it!

Using the VideoExport-library
Now you are ready to use the VideoExport-library in Processing. All you have to do is adding a few required extra-lines of code to your sketches.
// import the library
import com.hamoid.*;

// create a new VideoExport-object
VideoExport videoExport;

void setup() {
  ...
  // Some settings
  videoExport = new VideoExport(this, "myVideo.mp4");
  videoExport.setFrameRate(30);
  videoExport.startMovie();
}
void draw() {
  ...
  // Save a frame!
  videoExport.saveFrame();
}

void keyPressed() {
  if (key == 'q') {
    videoExport.endMovie();
    exit();
  }
}
The options can be looked up in the library-folder:
your-processing-folder/libraries/VideoExport/examples/options/options.pdeNow get creative and make something awesome!
Update!
Here’s a super handy code-snippet that you can copy and paste into your Processing Sketch. I would recommend to put this in a tab called “rec”. If you then put the rec-function into the end of your draw-loop, the recording should work.
sketch.pde
void draw(){
// your code
rec();
}
rec.pde
final String sketchname = getClass().getName();

import com.hamoid.*;
VideoExport videoExport;

void rec() {
  if (frameCount == 1) {
    videoExport = new VideoExport(this, "../"+sketchname+".mp4");
    videoExport.setFrameRate(30);
    videoExport.startMovie();
  }
  videoExport.saveFrame();
}Related
 Preview: Random Compositions
One of the most exciting and maybe even unsettling discoveries in the learning process of Creative Coding in Graphic Design […]
 Getting started with Processing
Please note: This blogpost is currently in development While in p5.js there is a relatively confusing array of ways to […]
 Three ways to work with p5.js
When the first alpha release of p5.js appeared in July 2014, it kicked off a hugely important development for the […]
 I challenged Daniel Shiffman and here’s his response
This year I donated $700 to the Processing Foundation to support people who care about the development of the projects. […]
 How to write a simple HTML-Document
Hi folks! ☀️🖐️ I hope you are doing well! For a few months now I’ve been working on the question […]
 How to work with Layers in Processing?
Hello people, here comes a new session for you. This time I’ll explain how you can work with layers in […]
 Rhythm Studies
This session shows a possible solution for the assignment Rhythm Studies from my course Bauhaus Coding Workshop.